Help: Importing and Editing Tracks from iTunes
Note: It is easier to start with a design that has text areas so you can see your tracks when you import them. See "Adding Text".
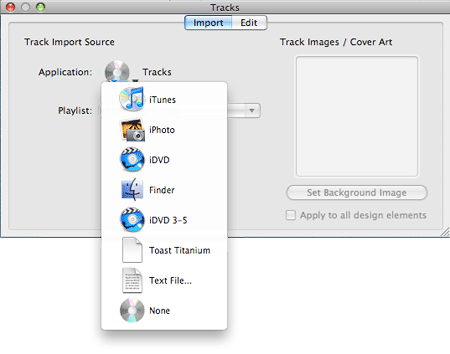
- Click Tracks
 in the bottom of the DiscLabel design window. The Tracks Palette will open.

- Choose iTunes as the source application of your track information to import song titles, artist names, track lengths, etc.
(For information on importing from other sources, such as iPhoto, a Finder window, an iDVD project, a Toast project or a text file, see "Advanced Topics: Importing Tracks from Sources Other than iTunes") - Make your playlist selection from the dropdown menu.
- If there is album art or images associated with the chosen playlist, it will appear in the window on the right. To use this album art in your design, click "Set Background Image". If you want the art to appear in all the design elements, such as the CD case cover or insert, click the checkbox next to "Apply to all design elements".
- Click on the "Edit" tab of the palette to preview the track information. You can edit the information and add or delete tracks manually.
You can save time by pre-selecting the playlist you need in iTunes, and then when you import from iTunes in DiscLabel, that playlist is chosen automatically
Specifying Tags to Display Imported Tracks
You can specify what track information appears in your design. Tags are used in text to specify where to place imported track information, and are accessed from the Track Format tab of the Inspector
- Make sure that you have a text object selected.
- Click
 and then the Track Format tab.
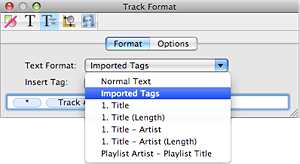
- Choose a format from the Text Format drop-down menu. There are five preset format options
- 1. Title
- 1. Title (Length)
- 1. Title - Artist
- 1 Title - Artist (Length)
- Playlist Artist - Playlist Title
(if a playlist contains more than one artist, "Various Artists" will be inserted)
- The track information is imported into the selected text object in the chosen format.
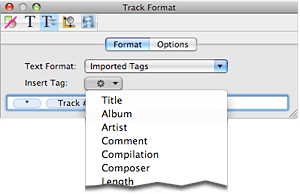
- If you want to customize further, you can choose individual data tags from Insert Tag. Place the text cursor where you want to insert your tag, and choose the tag you want from the menu. The tags you choose will appear in the field below. The tracks displayed in your design will automatically update.

Formatting Track Information
- You can insert any text or punctuation between tags, and it will appear in your design.
- Tags that are not valid for a particular set of imported data are displayed as empty strings.
- You can use non-breaking space between tags if you don't want a line break to come between them when formatted. Type to insert a non-breaking space.
- Insert tab and return characters into tagged text by typing and .
- You can remove tags by clicking the tag you wish to remove and pressing the delete key.
- You can change the font or color of any of the text displayed for each track by selecting the tags and or/text you wish to change, and choosing Format.
Format Options
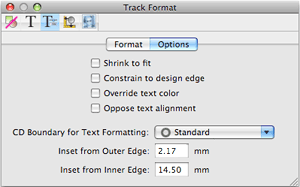
Click on the Options tab in the Track Formatting palette.

The options menu allows you to set options for the selected text object
- Shrink to Fit: automatically reduces the size of text that overruns a text object to fit into the text object.
- Constrain to Design Edge: when unchecked, text will flow over the boundary of a design, rather than being bound by it.
- Override Text Color: If you have two linked text boxes, you may want to choose a different color for the text in one of the boxes. Checking this option and choosing a color will use that alternate color for the text in the selected text box. This is particularly helpful if the two linked text boxes are on very different backgrounds and need different colors to be readable.
- Oppose Text Alignment: If you have two linked text boxes, you may want to choose a different alignment for the text in one of the boxes. Checking this option will cause the linked text box to be aligned opposite to the original text box. This way you can format tracks in two linked text boxes across a CD/DVD design, with the left side justified to the left, and the right side justified to the right. (Note: Shrink to Fit must be checked to activate the Oppose Text Alignment.)
© 2003-2009 SmileOnMyMac, LLC. All rights reserved.
SmileOnMyMac and DiscLabel are trademarks of SmileOnMyMac, LLC.