
Help: Print Set Up and Printing
- Choose the type of label paper you want to use from the Media dropdown menu.

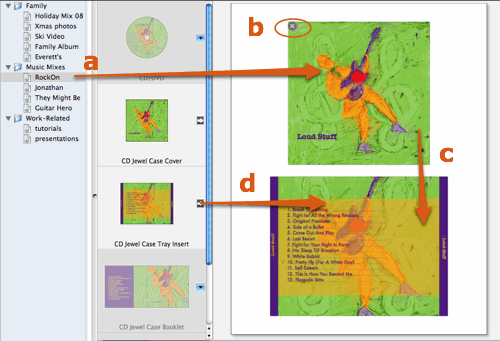
- Drag your design, or design element in the selected design, from the list on the left to the corresponding slot in the window on the right. (See the illustration below for options.)
- Drag from one slot to another to print multiple copies
- Click the Print icon.
- Set any printer options (such as output quality and paper type) in the in the dialog box that opens.
- Make sure your media is properly loaded in your printer and click .
See also Using Direct-to-Disc Printers and Using LightScribe for special instructions.
Options for drag-and-droppping and/or deleting designs
- Drag the design name from the design list to a media slot; if the design includes the design element for that media slot, it will drop in.
- Click the remove button that appears at top left of the media slot when the mouse hovers over it to remove design.
- Drag the design from one media slot to another media slot; if the design includes the design element for that media slot, it will drop in.
- Click the arrow or drag design element to a compatible media slot to place element in that slot.
Bleed
DiscLabel prints a 2mm bleed beyond the label perforation in all directions to cope with inconsistencies in setup accuracy and varying label types. You can change the bleed from DiscLabel's Preferences:
- Choose from the menu
- Click the Paper tab.
- Change the bleed to the desired value
Rasterize Printing
DiscLabel normally prints by sending high-level graphics commands to the printer driver, and the printer driver ultimately does the rendering required to print your label. Depending on the printer drive,r this can mean that gradients, shadows, and some transparency settings do not match what is shown on-screen.
DiscLabel can do all the image rendering. When you print, complete images, similar to printing photographs, are sent to the printer instead. The result will match the screen image very closely.
- Choose from the menu
- Click the Paper tab.
- Check the Rasterize Printing checkbox.
Printing
Once you have the media set up and the designs placed in the slots, click ![]() to open the print dialog box.
to open the print dialog box.
See also: "Calibrating Your Printer" for instructions on calibration.
© 2003-2009 SmileOnMyMac, LLC. All rights reserved.
SmileOnMyMac and DiscLabel are trademarks of SmileOnMyMac, LLC.