
Help: Editing Images
Cropping Images
- Select an image
- Click
 or double-click on the image.
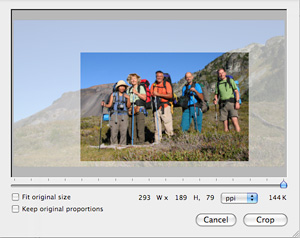
- In the dialog that opens, click and drag over the section of the image that you want to keep.
- Check Fit original size if you want the cropped image to be resized to fit the size of the original image.
- Check Keep proportions if you want the cropped image to have the proportional height and width of the original image.
- Click .
Adjusting Transparency in Images
- Select an image.
- Click Inspector
 in the bottom of the DiscLabel Edit window, and the Inspector palette will open. Click on the first tab on the right to open the Image Properties tab.
- Click and drag the Opacity Slider to the desired level, or enter a percentage value.
Masking An Image
You can apply a mask from the Inspector by clicking Mask and choosing a shape.
Masks can also be applied and edited in the Effects window under Available Filters: Composite: Mask. For more details, see "Using Effects".
Applying Image Effects
You can access a wide range of image effects in DiscLabel. Click Image Effect to open the Effects window. See "Using Effects" for details on applying effects to images.
Resolution
You can import an image of any size and scale it in DiscLabel to effectively get any resolution you want. So, for example, a 1500 x 1500 image at 72dpi, when scaled across a 5" disc will yield 300 dpi, and a 750 x 750 image at 72dpi will yield 150 dpi, etc.
If you import PDF line art into DiscLabel you can still scale and crop it. The picture will scale to maximize use of the resolution of the output device.
© 2003-2009 SmileOnMyMac, LLC. All rights reserved.
SmileOnMyMac and DiscLabel are trademarks of SmileOnMyMac, LLC.